
Email marketers are always on the lookout for ways to improve their email visibility and open rates. While there's no one-size-fits-all solution, an emerging email standard called Brand Indicators for Message Identification (BIMI for short) can be useful. BIMI can help increase brand recognition and reduce email fraud. In this article, we'll take a closer look at what BIMI is all about!
Developed by the Authindicators Working Group, BIMI is a standard that attaches your brand’s logo to your authenticated email messages. With this simple, visual verification, recipients can recognize and trust the messages you send.
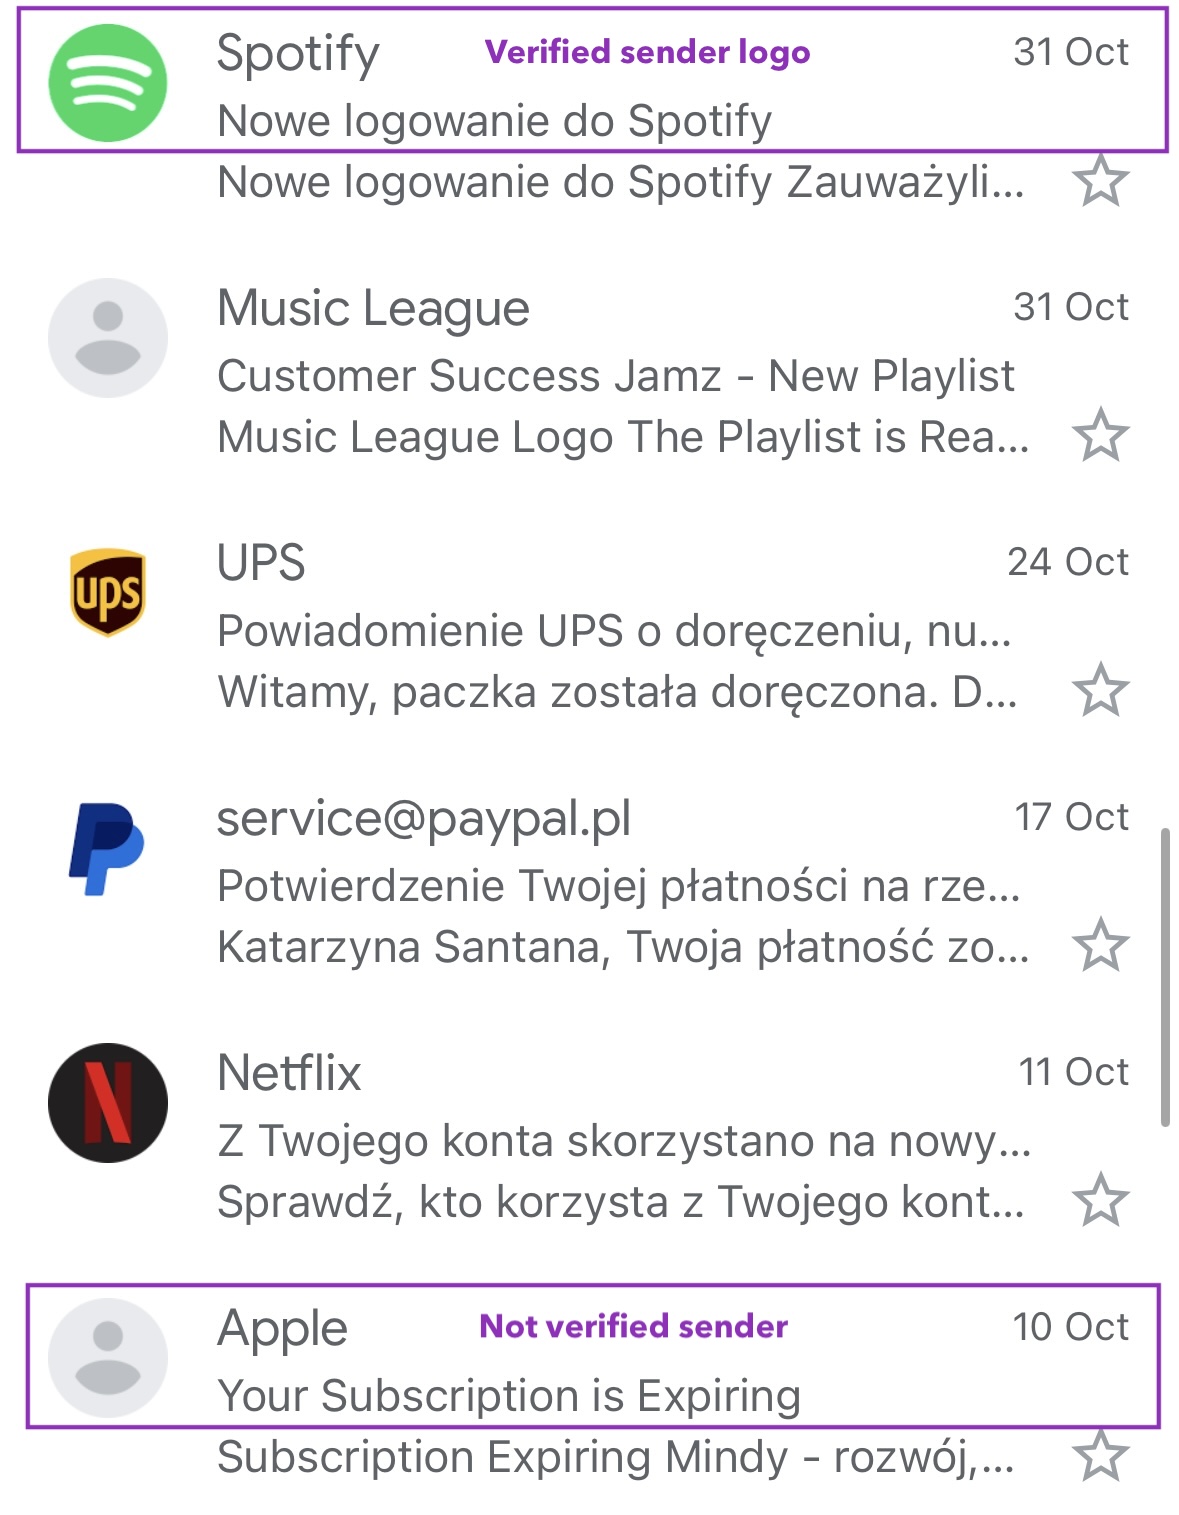
You’ve likely seen it in action, in your own inbox. Take a look at the examples below:
The logo that appears next to the brand’s message is known as a verified sender logo.
Example of email with no sender logo vs example of an email with BIMI sender logo
How can BIMI benefit marketers?
-
BIMI helps build brand trust and increases security
BIMI can help boost your brand’s visibility, build brand recognition, and reinforce trust. It was created to help prevent fraudulent emails, and in a world where phishing and email scams are on the rise, it’s imperative to establish trust with subscribers. When subscribers see your logo next to your messages in supported inboxes, they can immediately trust that it’s an actual email from you (and not a dangerous phishing attempt).
- BIMI can be beneficial to your email deliverability
Implementing the BIMI standard will not guarantee every one of your emails will reach the inbox, however, BIMI could persuade more subscribers to open and engage with your messages. That’s a sign to mailbox providers that people want what you’re sending. So, they’ll be more likely to let you land in the inbox.
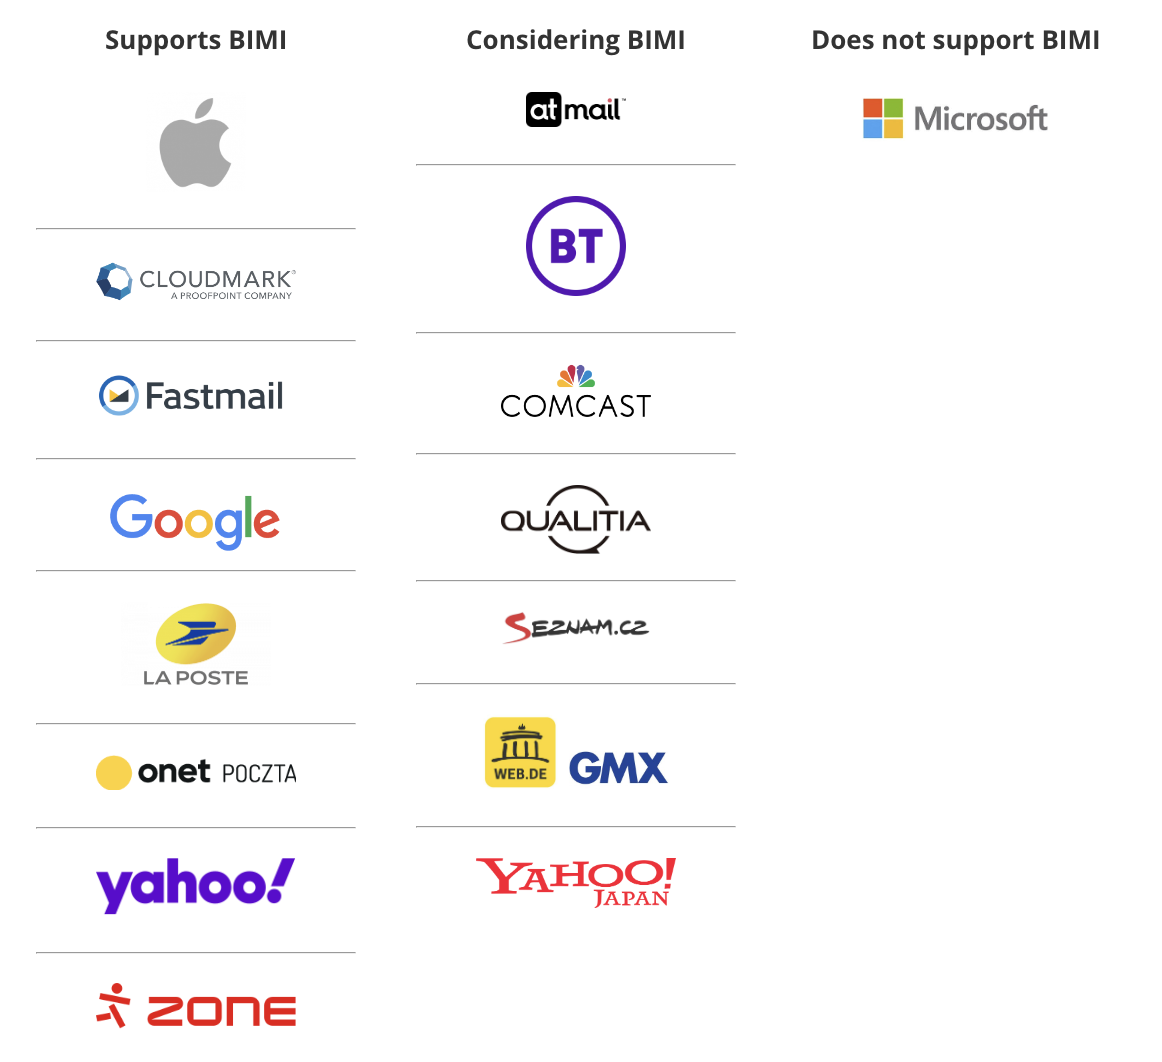
What mailbox providers support BIMI?
BIMI support includes several major inboxes like Gmail and Apple. Here’s a list of BIMI support by mailbox provider, as of June 2023.
Gmail BIMI update: Blue checkmark icons
On May 3, 2023, Gmail announced it would take BIMI support a step further by displaying a blue checkmark icon for senders who have adopted it, providing users of this inbox service provider (ISP) with enhanced visual verification.
This provides a level of verification for your brand that can help increase customer trust and improve your email open rates. In addition, it can also help prevent phishing attacks by making it easier for recipients to distinguish legitimate emails from fraudulent ones.
If interested, for more information, please review the Google Workspace Blog post.
How can BIMI be set up?
If you want to display your logo in your recipients' inboxes, you can configure BIMI for your organization by following the steps outlined below. It's important to keep in mind that BIMI is still a new standard, and not all email clients support it yet. However, as more clients adopt BIMI, it's likely to become an important part of email authentication. For those just getting started, or anyone who wants a refresher, this is a step-by-step guide to setting up BIMI for your domain.
Step 1: Authenticate Your Email Domain with DMARC
Before you can configure BIMI, you need to authenticate your email domain. This involves setting up Domain-based Message Authentication, Reporting, and Conformance (DMARC) record for your domain.
DMARC is a policy that allows domain owners to specify how their emails should be handled if they fail authentication checks. DMARC works by using SPF and DKIM to check if an email is legitimate. If the email fails these checks, the domain owner can specify how the email should be handled by a the recipient’s inbox provider. For example, the email can be rejected, quarantined, or marked as spam.
To set up DMARC, you need to create a DMARC record for your domain. This record should be in the following format:
_dmarc.example.com. IN TXT "v=DMARC1; p=quarantine; rua=mailto:dmarc@example.com; ruf=mailto:dmarc@example.com; fo=1"
In this example, example.com is the domain of the organization. The p parameter specifies the policy for handling failed emails. The possible values for p are none (no action taken), quarantine (put the email in the spam folder), and reject (reject the email outright). The rua and ruf parameters specify the email addresses where DMARC reports should be sent. The fo parameter specifies how DMARC should handle malformed emails. In order to configure BIMI, your DMARC policy must implement either reject or quarantine in the p/sp tag fields.
Here is a link to our documentation on DMARC Policies: https://www.customer.io/docs/journeys/authentication/#dmarc-policies
Step 2: Provide logo in a secure format with specific parameters
BIMI requires that a logo be in Scalable Vector Graphics (SVG) format to provide the highest quality image in the inbox for all devices. Overall, logos must be centered, have a solid background, a square aspect ratio, and be under 32 kilobytes. The logo must also be hosted on a publicly accessible server. This is how the BIMI record will “call in” and render the logo into the recipient’s inbox. Here is a detailed list of the BIMI logo specifications.
Step 3: Create a BIMI Record
After authenticating your email domain, you can create a BIMI record. The record is a DNS TXT record that specifies your organization's logo location, in the following format:
default._bimi.example.com. IN TXT "v=BIMI1; l=https://example.com/logo.svg"
In this example, example.com is the domain of the organization, and logo.svg is the name of the logo file. The l parameter specifies the URL of the logo file.
There’s also a BIMI record generator that spits out all of this information for you. Just give it your domain, SVG image, and optional VMC file.
Step 4: Test Your BIMI Setup
Once you have configured BIMI, you should test your setup to ensure that it is working correctly. You can use the BIMI Validator tool to test your BIMI record and logo. This tool will check if your BIMI record is valid and if your logo can be accessed. Expect it to take a few weeks to show up in all inboxes.
To stay up-to-date with the latest BIMI requirements and news, I recommend visiting the BIMI working group site. By doing so, you can ensure that you are well informed and equipped to set up your BIMI effectively.